

Author: Cat Cooley
Recycled Winter Crafts for Kids: Mini Nutcrackers
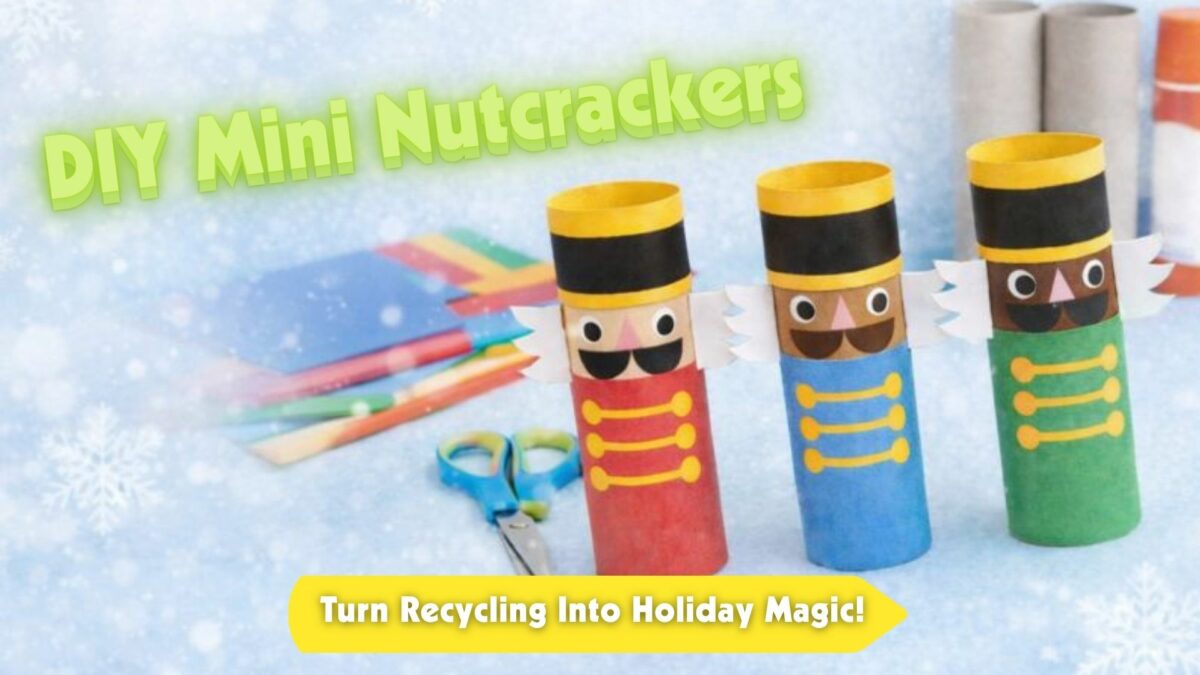
As winter approaches, finding simple and fun crafts can make the season feel extra special. DIY Mini Nutcracker Soldiers are an easy holiday project that kids and adults can enjoy together. Made from toilet paper rolls and colorful construction paper, these festive decorations are affordable, creative, and perfect for home, school, or holiday parties. By the end of this craft, you’ll have a cheerful nutcracker that adds a classic winter touch.
Supplies Needed for This Winter Craft
Before getting started, it helps to gather all your supplies in one place.
- Empty toilet paper rolls
- Construction paper (red, blue, green, black, yellow, white, and skin-tone colors)
- Child-safe scissors
- Glue stick or liquid glue
- Black marker
Once everything is ready, you can begin crafting!

How to Make DIY Mini Nutcracker Soldiers
Step 1: Cover the Roll
To start building your nutcracker, wrap a toilet paper roll with a piece of colored construction paper. This will become the uniform, so choose a bright holiday color. Glue the paper in place and trim off any extra. After this step, the base of your nutcracker is complete.
Step 2: Create the Face
Next, it’s time to add personality to your nutcracker. Cut a small rectangle of skin-tone paper and glue it near the top of the roll. Draw two eyes with a black marker, then add a triangle nose and a bold mustache using either paper cutouts or the marker. Once finished, your nutcracker will start to come to life.
Step 3: Make the Hat
After the face is done, you can move on to the hat. Wrap a strip of black construction paper around the top of the roll and glue it in place. Add a thin yellow strip along the edge for decoration. With the hat added, your nutcracker will look much more complete.
Step 4: Add the Uniform Details
Now it’s time to decorate the uniform. Cut thin strips and small circles from yellow construction paper to create buttons and trim. Glue these pieces onto the front of the roll. When this step is finished, your nutcracker will look bright and festive.
Step 5: Finish with Hair
Finally, add the classic nutcracker hair. Cut two small wing-shaped pieces from white paper and glue one to each side of the face. Let everything dry completely. At this point, your DIY Mini Nutcracker Soldier is ready to stand tall.
Conclusion
In the end, DIY Mini Nutcracker Soldiers are a fun and recycled winter craft for kids that encourages creativity and reuse of materials. They work well as holiday decorations, classroom crafts, or handmade gifts. Once you line them up or display them proudly, you’ll see how a few basic supplies can turn into a festive winter tradition.

Easy winter crafts for kids that keep little hands busy before dinner. Make this adorable snowy owl pine cone craft with simple supplies.
Snowman Craft for Kids: DIY Ornaments
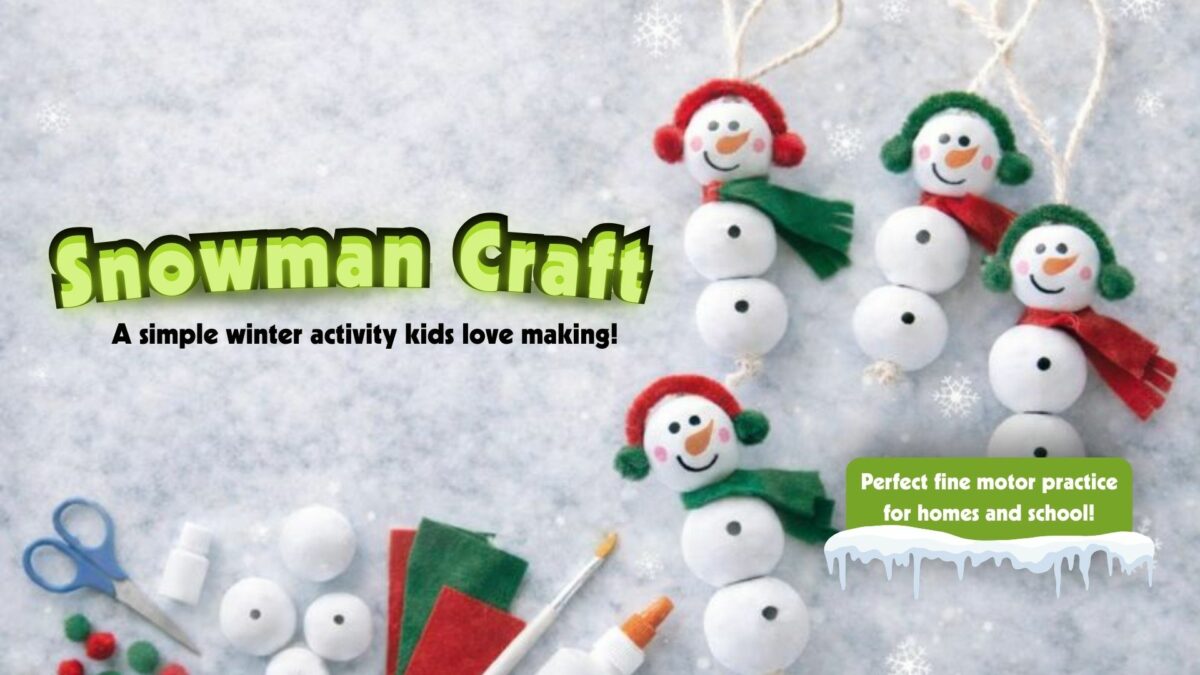
When winter arrives, simple crafts can help bring warmth and creativity indoors. Snowman crafts for kids, like these cute beaded snowmen, are an easy and charming way to celebrate the season. Using wooden beads and a few basic supplies, this winter craft is perfect for classrooms, cozy days at home, or handmade gifts kids will love creating.
Supplies for This Beaded Snowman Craft
To get started, gather a few simple materials.
- Wooden beads in three different sizes – You can buy or paint the beads white.
- Twine or string
- Felt or fabric scraps for scarves
- Small pom-poms for earmuffs
- Paint or markers for faces
- Scissors
- Glue
Having everything ready will make the crafting process more smooth!

How to Make Beaded Snowman Crafts Step by Step
Step 1: String the Beads
First, thread three beads onto a piece of twine, starting with the largest bead for the bottom, a medium bead for the middle, and the smallest bead for the head. Tie a knot at the bottom to keep the beads in place. Once this is done, you will see the snowman shape come together.
Step 2: Add the Face
Next, use paint or markers to draw the snowman’s face on the smallest bead. Add simple eyes, a small carrot-shaped nose, and rosy cheeks if you like. After this step, your snowman will start to show its personality.
Step 3: Make the Scarf
Now it’s time to keep your snowman warm. Cut a thin strip of felt or fabric and wrap it around the middle bead to create a scarf. Secure it with a small amount of glue. Once the scarf is in place, your snowman will look cozy and festive.
Step 4: Add the Earmuffs
Finally, glue a small pom-pom to each side of the head bead to create earmuffs. Let everything dry completely before moving the snowman. At this point, your Cute Beaded Snowman is finished and ready to display.
Conclusion
In the end, Cute Beaded Snowmen are a fun and relaxing winter craft that encourages creativity and fine motor skills. Whether you hang them as ornaments, display them on a shelf, or give them as gifts, these sweet snowmen are a simple way to celebrate the winter season with handmade charm.
Easy winter crafts for kids that keep little hands busy before dinner. Make this adorable snowy owl pine cone craft with simple supplies.
Dollar Store DIY Christmas Decor for the Porch

When the holiday season approaches, many moms start searching for Dollar Store DIY Christmas Decor that looks festive without adding stress. Decorating for Christmas doesn’t have to mean expensive store runs or complicated projects. This peppermint lollipop decoration is affordable, simple, and easy enough to make in one afternoon. It’s perfect for porches, entryways, or holiday planters, and it uses supplies you can grab quickly at the Dollar Store. Now that you know why this project works so well, let’s talk about why moms love crafts like this.
Why Moms Love Dollar Store DIY Christmas Decor
For busy moms, holiday decorating needs to be quick, budget-friendly, and realistic. Dollar Store DIY Christmas Decor checks all those boxes because it keeps costs low and prep time short. This project doesn’t require special tools or crafting experience, and it can be done while kids are nearby—or even helping. Best of all, the finished decoration looks cheerful and store-bought without the high price tag. With that in mind, let’s gather everything you’ll need to get started.

Supplies Needed for This Easy Christmas Decoration
Before starting any DIY project, having all your supplies ready makes the process much smoother.
- White paper plate(s) (sturdy works best—9–10″)
- Red acrylic paint (and optional green if you want mixed colors)
- Paintbrush (medium/flat brush)
- Clear cellophane wrap (basket wrap or big clear treat bags)
- Ribbon (red/green)
- Wooden dowel(s) or bamboo garden stakes (for the “lollipop stick”)
- Hot glue gun + glue sticks (or strong tape)
- Optional: clear spray sealer (to protect from moisture)
Once your supplies are ready, it’s time to start crafting.
Step-by-Step Guide to Making a Peppermint Lollipop Decoration
Start With Clean Plates
To begin this Dollar Store DIY Christmas Decor project, grab a plain white paper plate. If your plate feels flimsy, make it sturdier by hot-gluing two plates back-to-back. This helps your decoration hold its shape, especially if you plan to display it outdoors. Once your base is strong, you’re ready to paint.
Flip the Plates Upside Down
Next, turn the plate upside down so the raised back side is facing up. This is the side you’ll paint because it creates the rounded “candy” look when finished. After flipping it over, you can start planning the swirl design.

Create the Peppermint Swirls
Now it’s time to paint the classic peppermint pattern. Imagine the plate is a clock and paint curved “pinwheel” wedges that twist outward from the center. Paint one red wedge, then leave the next space white, and repeat until you go all the way around. Most plates look best with about 6–8 red swirls, so try to keep your wedges roughly even.
Let It Dry Completely
Once the swirl is painted, let the plate dry fully before moving on. If the red looks light or streaky, add a second coat and let it dry again. For outdoor Dollar Store DIY Christmas Decor, you can also spray a clear sealer over the paint once it’s dry to help protect it from moisture.
Tie It Off With Ribbon
After the paint is dry, lay a large sheet of clear cellophane flat on a table. Place the painted plate in the center with the design facing outward. Pull the cellophane up and around the plate, then gather it at the bottom like you’re wrapping a real lollipop. When it’s gathered neatly, you’re ready to secure it.
Add the Lollipop Stick
Now attach the dowel or garden stake to create the lollipop stick. Place the stick along the gathered bottom and hot glue it firmly to the wrapped area. For extra strength, you can tape it first and then hot glue over the tape. If you’re making porch pot lollipops, use a longer stake so it stands upright in foam or soil.
Display Your Dollar Store DIY Christmas Decor
Finally, put your peppermint lollipop decoration on display. Stick the stake into a porch planter using a foam block inside the pot for stability, or tie it onto a wreath or door décor setup. Grouping a few together in red and green makes the whole display look even more eye-catching.
Conclusion
In the end, Dollar Store DIY Christmas Decor like this peppermint lollipop proves that holiday decorating doesn’t have to be overwhelming. This project is affordable, quick, and easy to fit into a busy schedule. Whether you make one or a whole set, it’s a simple way to bring Christmas cheer into your home without overspending. And just like that, your space feels festive, cozy, and ready for the season.

Recycled winter crafts for kids made easy with DIY Mini Nutcrackers using toilet paper rolls. A fun, affordable holiday craft for home or school!