

Winter Crafts for Kids: Easy Owl Paper Plate Activity
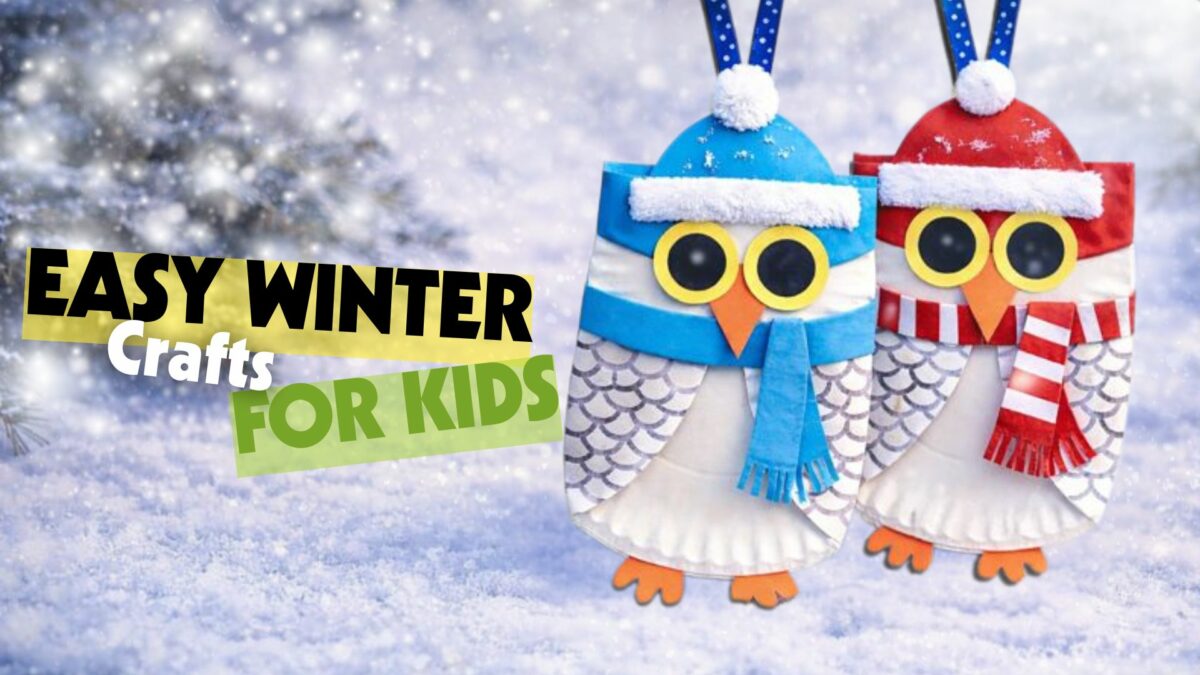
When cold weather keeps everyone indoors, winter crafts for kids become the perfect way to keep them happy, creative, and occupied. This Owl Paper Plate Craft is an easy, budget-friendly activity that turns simple supplies into an adorable winter decoration. Kids love choosing colors, adding feathers, and giving their owls big personalities—all while staying entertained during the busy winter season.
Before we get started, let’s take a closer look at why this craft works so well: it’s quick to set up, fun for all ages, and creates a cute keepsake kids will be excited to display.

Supplies
- Uncoated, Basic Paper plates
- Acrylic Paint Construction paper
- Scissors
- Ribbon for hanging
- Hot or Tacky Glue
Directions
Now that you’ve gathered your supplies, it’s time to help your kids create their own colorful winter owls. These steps are simple enough for little hands to follow, but they still give plenty of room for creativity.
- Paint the Paper Plate – Start by painting the entire front of the paper plate using acrylic paint. Choose classic winter colors like blue, white, or gray—or let kids get creative with fun patterns.
- Cut Out Owl Features – While the plate dries, use construction paper to cut out two large eyes, a small triangle beak, and feather shapes for the wings. Older kids can cut their own pieces, while younger ones may need a little help.
- Assemble the Face – Once the paint is dry, glue the eyes and beak onto the top half of the plate. Encourage kids to place the features however they like—silly, serious, surprised, or sleepy!
- Attach the Wings – Glue the construction paper wings to the sides of the plate. Kids can angle them upward, downward, or out to the sides depending on the look they want.
- Add Ribbon for Hanging – Flip the plate over and glue a loop of ribbon near the top. This makes the owl easy to hang on a wall, door, or bulletin board.
- Personalize the Owl – If kids want to add extra details—like eyebrows, patterns, or even glitter—this is the perfect time to let them customize their little winter friend.
Once all the pieces are attached, your child will have their very own owl decoration ready to display proudly.
Conclusion
With your paper plate owls complete, your kids will feel proud of the winter-themed artwork they created, and you’ll enjoy a peaceful moment knowing they were happily occupied. This craft is simple, charming, and perfect for cold days when everyone needs a little creative break.
As you wrap up the activity, hang the owls somewhere special or let the kids gift them to family members. These small handmade decorations often become cherished winter keepsakes.
And just like that, you’ve turned a few basic supplies into a fun memory-making moment—proof that winter days can be just as magical indoors as they are outside.

Recycled winter crafts for kids made easy with DIY Mini Nutcrackers using toilet paper rolls. A fun, affordable holiday craft for home or school!
Recycled Winter Crafts for Kids: Mini Nutcrackers
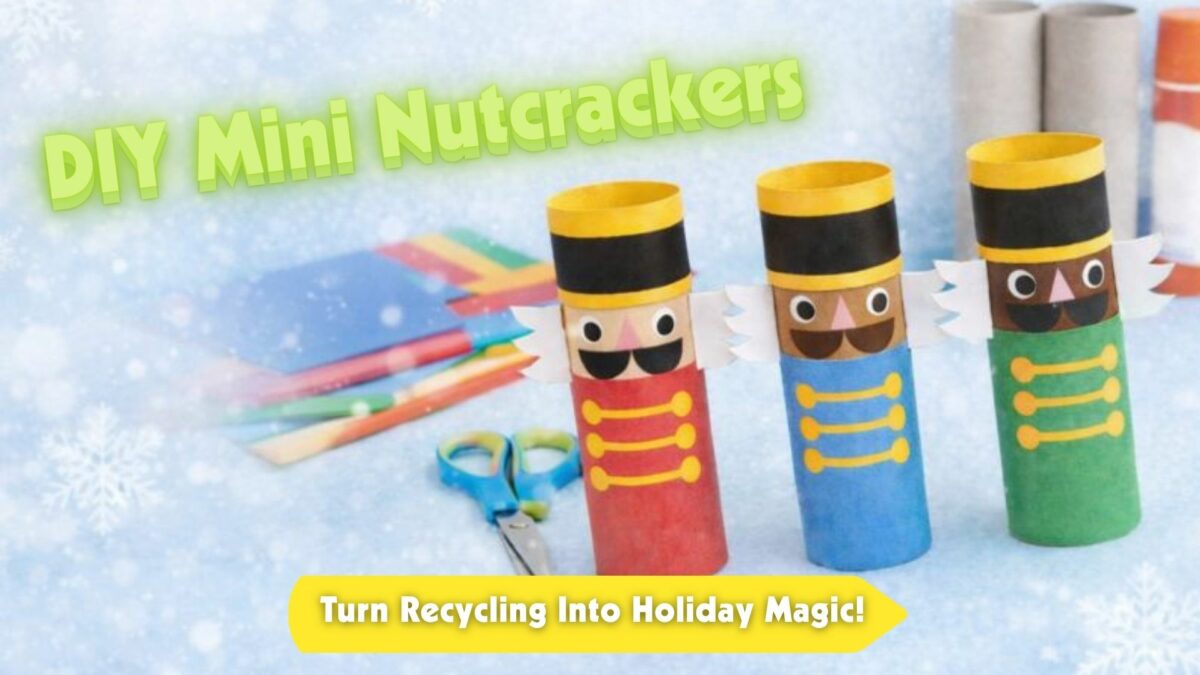
As winter approaches, finding simple and fun crafts can make the season feel extra special. DIY Mini Nutcracker Soldiers are an easy holiday project that kids and adults can enjoy together. Made from toilet paper rolls and colorful construction paper, these festive decorations are affordable, creative, and perfect for home, school, or holiday parties. By the end of this craft, you’ll have a cheerful nutcracker that adds a classic winter touch.
Supplies Needed for This Winter Craft
Before getting started, it helps to gather all your supplies in one place.
- Empty toilet paper rolls
- Construction paper (red, blue, green, black, yellow, white, and skin-tone colors)
- Child-safe scissors
- Glue stick or liquid glue
- Black marker
Once everything is ready, you can begin crafting!

How to Make DIY Mini Nutcracker Soldiers
Step 1: Cover the Roll
To start building your nutcracker, wrap a toilet paper roll with a piece of colored construction paper. This will become the uniform, so choose a bright holiday color. Glue the paper in place and trim off any extra. After this step, the base of your nutcracker is complete.
Step 2: Create the Face
Next, it’s time to add personality to your nutcracker. Cut a small rectangle of skin-tone paper and glue it near the top of the roll. Draw two eyes with a black marker, then add a triangle nose and a bold mustache using either paper cutouts or the marker. Once finished, your nutcracker will start to come to life.
Step 3: Make the Hat
After the face is done, you can move on to the hat. Wrap a strip of black construction paper around the top of the roll and glue it in place. Add a thin yellow strip along the edge for decoration. With the hat added, your nutcracker will look much more complete.
Step 4: Add the Uniform Details
Now it’s time to decorate the uniform. Cut thin strips and small circles from yellow construction paper to create buttons and trim. Glue these pieces onto the front of the roll. When this step is finished, your nutcracker will look bright and festive.
Step 5: Finish with Hair
Finally, add the classic nutcracker hair. Cut two small wing-shaped pieces from white paper and glue one to each side of the face. Let everything dry completely. At this point, your DIY Mini Nutcracker Soldier is ready to stand tall.
Conclusion
In the end, DIY Mini Nutcracker Soldiers are a fun and recycled winter craft for kids that encourages creativity and reuse of materials. They work well as holiday decorations, classroom crafts, or handmade gifts. Once you line them up or display them proudly, you’ll see how a few basic supplies can turn into a festive winter tradition.

Easy winter crafts for kids that keep little hands busy before dinner. Make this adorable snowy owl pine cone craft with simple supplies.
Snowman Craft for Kids: DIY Ornaments
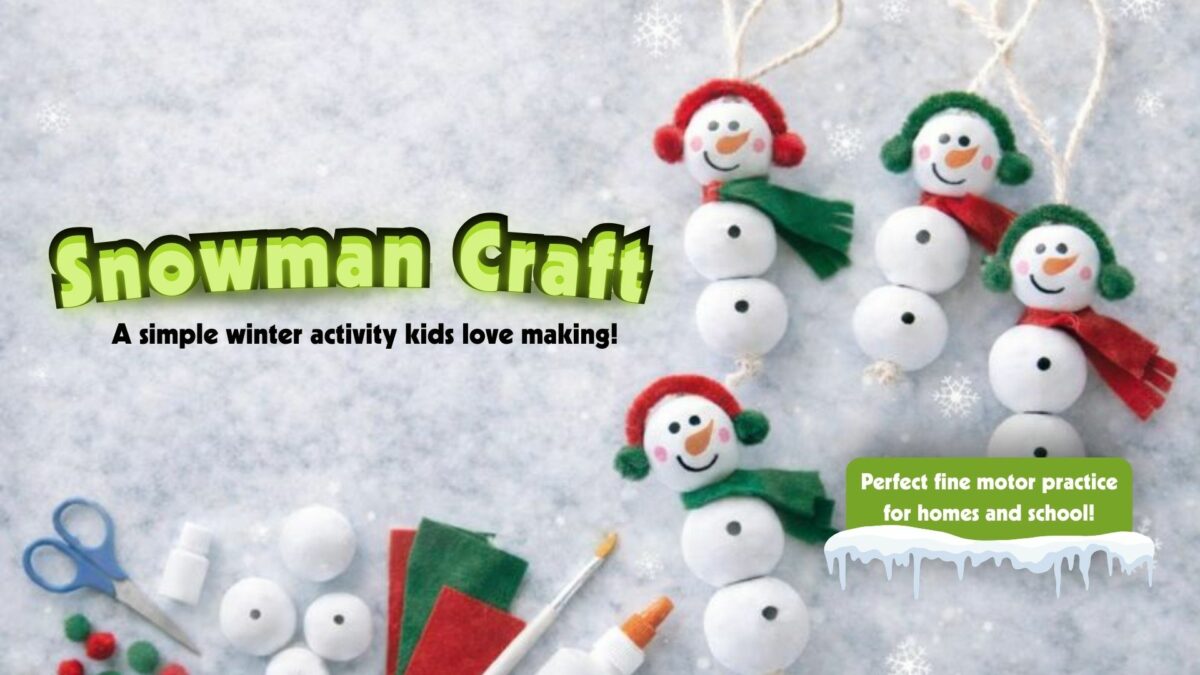
When winter arrives, simple crafts can help bring warmth and creativity indoors. Snowman crafts for kids, like these cute beaded snowmen, are an easy and charming way to celebrate the season. Using wooden beads and a few basic supplies, this winter craft is perfect for classrooms, cozy days at home, or handmade gifts kids will love creating.
Supplies for This Beaded Snowman Craft
To get started, gather a few simple materials.
- Wooden beads in three different sizes – You can buy or paint the beads white.
- Twine or string
- Felt or fabric scraps for scarves
- Small pom-poms for earmuffs
- Paint or markers for faces
- Scissors
- Glue
Having everything ready will make the crafting process more smooth!

How to Make Beaded Snowman Crafts Step by Step
Step 1: String the Beads
First, thread three beads onto a piece of twine, starting with the largest bead for the bottom, a medium bead for the middle, and the smallest bead for the head. Tie a knot at the bottom to keep the beads in place. Once this is done, you will see the snowman shape come together.
Step 2: Add the Face
Next, use paint or markers to draw the snowman’s face on the smallest bead. Add simple eyes, a small carrot-shaped nose, and rosy cheeks if you like. After this step, your snowman will start to show its personality.
Step 3: Make the Scarf
Now it’s time to keep your snowman warm. Cut a thin strip of felt or fabric and wrap it around the middle bead to create a scarf. Secure it with a small amount of glue. Once the scarf is in place, your snowman will look cozy and festive.
Step 4: Add the Earmuffs
Finally, glue a small pom-pom to each side of the head bead to create earmuffs. Let everything dry completely before moving the snowman. At this point, your Cute Beaded Snowman is finished and ready to display.
Conclusion
In the end, Cute Beaded Snowmen are a fun and relaxing winter craft that encourages creativity and fine motor skills. Whether you hang them as ornaments, display them on a shelf, or give them as gifts, these sweet snowmen are a simple way to celebrate the winter season with handmade charm.
Easy winter crafts for kids that keep little hands busy before dinner. Make this adorable snowy owl pine cone craft with simple supplies.