

Category: Holidays
Dollar Store DIY Christmas Decor for the Porch

When the holiday season approaches, many moms start searching for Dollar Store DIY Christmas Decor that looks festive without adding stress. Decorating for Christmas doesn’t have to mean expensive store runs or complicated projects. This peppermint lollipop decoration is affordable, simple, and easy enough to make in one afternoon. It’s perfect for porches, entryways, or holiday planters, and it uses supplies you can grab quickly at the Dollar Store. Now that you know why this project works so well, let’s talk about why moms love crafts like this.
Why Moms Love Dollar Store DIY Christmas Decor
For busy moms, holiday decorating needs to be quick, budget-friendly, and realistic. Dollar Store DIY Christmas Decor checks all those boxes because it keeps costs low and prep time short. This project doesn’t require special tools or crafting experience, and it can be done while kids are nearby—or even helping. Best of all, the finished decoration looks cheerful and store-bought without the high price tag. With that in mind, let’s gather everything you’ll need to get started.

Supplies Needed for This Easy Christmas Decoration
Before starting any DIY project, having all your supplies ready makes the process much smoother.
- White paper plate(s) (sturdy works best—9–10″)
- Red acrylic paint (and optional green if you want mixed colors)
- Paintbrush (medium/flat brush)
- Clear cellophane wrap (basket wrap or big clear treat bags)
- Ribbon (red/green)
- Wooden dowel(s) or bamboo garden stakes (for the “lollipop stick”)
- Hot glue gun + glue sticks (or strong tape)
- Optional: clear spray sealer (to protect from moisture)
Once your supplies are ready, it’s time to start crafting.
Step-by-Step Guide to Making a Peppermint Lollipop Decoration
Start With Clean Plates
To begin this Dollar Store DIY Christmas Decor project, grab a plain white paper plate. If your plate feels flimsy, make it sturdier by hot-gluing two plates back-to-back. This helps your decoration hold its shape, especially if you plan to display it outdoors. Once your base is strong, you’re ready to paint.
Flip the Plates Upside Down
Next, turn the plate upside down so the raised back side is facing up. This is the side you’ll paint because it creates the rounded “candy” look when finished. After flipping it over, you can start planning the swirl design.

Create the Peppermint Swirls
Now it’s time to paint the classic peppermint pattern. Imagine the plate is a clock and paint curved “pinwheel” wedges that twist outward from the center. Paint one red wedge, then leave the next space white, and repeat until you go all the way around. Most plates look best with about 6–8 red swirls, so try to keep your wedges roughly even.
Let It Dry Completely
Once the swirl is painted, let the plate dry fully before moving on. If the red looks light or streaky, add a second coat and let it dry again. For outdoor Dollar Store DIY Christmas Decor, you can also spray a clear sealer over the paint once it’s dry to help protect it from moisture.
Tie It Off With Ribbon
After the paint is dry, lay a large sheet of clear cellophane flat on a table. Place the painted plate in the center with the design facing outward. Pull the cellophane up and around the plate, then gather it at the bottom like you’re wrapping a real lollipop. When it’s gathered neatly, you’re ready to secure it.
Add the Lollipop Stick
Now attach the dowel or garden stake to create the lollipop stick. Place the stick along the gathered bottom and hot glue it firmly to the wrapped area. For extra strength, you can tape it first and then hot glue over the tape. If you’re making porch pot lollipops, use a longer stake so it stands upright in foam or soil.
Display Your Dollar Store DIY Christmas Decor
Finally, put your peppermint lollipop decoration on display. Stick the stake into a porch planter using a foam block inside the pot for stability, or tie it onto a wreath or door décor setup. Grouping a few together in red and green makes the whole display look even more eye-catching.
Conclusion
In the end, Dollar Store DIY Christmas Decor like this peppermint lollipop proves that holiday decorating doesn’t have to be overwhelming. This project is affordable, quick, and easy to fit into a busy schedule. Whether you make one or a whole set, it’s a simple way to bring Christmas cheer into your home without overspending. And just like that, your space feels festive, cozy, and ready for the season.

Recycled winter crafts for kids made easy with DIY Mini Nutcrackers using toilet paper rolls. A fun, affordable holiday craft for home or school!
Easy Winter Crafts for Kids to Keep Them Busy Before Dinner
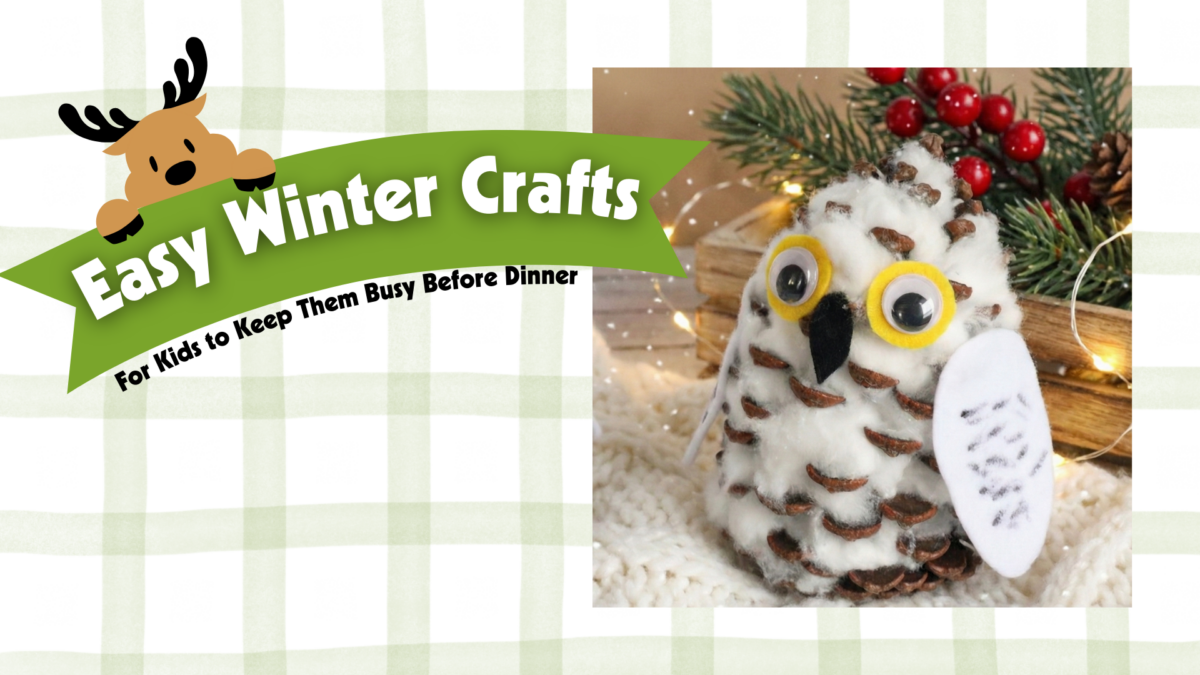
During the winter season, kids are often looking for something fun to keep them busy—and that’s where easy winter crafts for kids come in handy. This Snowy Owl Pine Cone Craft is the perfect mix of easy, adorable, and low-mess, making it an ideal activity. All you need are a few basic supplies and a handful of cotton balls to transform an ordinary pine cone into a fluffy little owl.
Before we jump into the steps, let’s walk through what makes this craft such a great choice: it keeps kids entertained, encourages creativity, and results in a charming fall decoration they’ll be excited to show off.

Supplies
- Medium sized Pine cones
- Black, yellow, and white felt
- Large Googly eyes
- Sharpie marker
- 15 Cotton balls per Owl
- Hot glue or Tacky Glue
Directions
Now that you’ve gathered your supplies, it’s time to bring these cute snowy owls to life. These steps are simple enough for kids to follow with just a little guidance—especially if you’re using tacky glue instead of hot glue.
- Prep Your Pine Cones – Make sure each pine cone is clean and dry. Shake out any loose pieces so the cotton will adhere well.
- Add the Fluffy Owl Feathers – Pull apart the cotton balls slightly, then tuck small pieces into the gaps of the pine cone. Cover the entire pine cone until it looks soft and snowy, leaving the bottom open so it sits flat.
- Create the Face – Cut a small yellow felt triangle for the beak and two white felt circles for the eye bases. Use the sharpie to outline the edges if your child wants extra detail.
- Attach the Eyes – Glue the white felt circles onto the front of the pine cone, then add the large googly eyes on top. Place the yellow felt beak just below the eyes.
- Add Wings and Feet (Optional) – For extra personality, cut small wing shapes from black felt and glue them to the sides. You can also cut two tiny felt feet to glue at the bottom.
- Let It Dry – Allow the glue to fully dry before moving the owl. If you’re using hot glue, this step will be quick; tacky glue may take a bit longer.
Once the owl is dry, your kids will have a charming fall decoration that’s perfect for the table, mantel, or even as part of a Thanksgiving centerpiece.
Conclusion
With your snowy owl pine cones complete, your kids will feel proud of the whimsical woodland creatures they’ve created—and you’ll enjoy a little extra time to focus on dinner. This craft is simple, cozy, and full of seasonal charm, giving kids a fun way to participate in the holiday atmosphere.
As you wrap up this activity, encourage the kids to display their owls somewhere special or gift them to family members arriving for dinner. It’s a sweet way to spark conversation and celebrate their creativity.
And just like that, you’ve kept little hands busy, added a touch of fall magic to your home, and created a memory that makes the holidays feel even more meaningful.
DIY Mother’s Day Gifts for Kids | Classrooms, Churches & Home
Looking for thoughtful and affordable ways to celebrate the amazing moms and grandmas in your life? Whether you’re a parent, teacher, or church leader, these DIY Mother’s Day Gifts for Kids are perfect for showing love and appreciation without breaking the bank. With simple materials and big heart, kids can create something meaningful that moms and grandmas will truly treasure. These ideas are fun, flexible, and perfect for classrooms, Sunday school, or a cozy afternoon at home.


DIY Sugar Scrub
A relaxing bath is one of the best gifts a busy mom or grandma can receive—and this homemade sugar scrub makes it even better. With just a few kitchen ingredients, kids can create a gentle exfoliating scrub that feels like a mini spa day in a jar. Best of all, this gift is customizable! Choose the sugar, oil, and scent that fits your loved one’s personality. Whether you’re crafting in a classroom or at home, this project is simple, fun, and leaves room for creativity.
Here’s What You’ll Need:
- 1 cup sugar (white sugar for gentle exfoliation, or raw sugar for a coarser scrub)
- ½ cup oil (olive oil, coconut oil, or any mild food-grade oil)
- Few drops of vitamin E oil (optional, for skin nourishment)
- Extract or essential oil for scent (vanilla, peppermint, citrus, or lavender are great picks)
- Food coloring (optional, use liquid for better mixing)
- Small jar or container with lid
- Decorations like a ribbon or handmade tag
Instructions
- In a bowl, mix the sugar and oil until it reaches your desired texture.
- Add a few drops of your chosen scent and mix well.
- Stir in food coloring—just a drop or two—for a fun touch.
- Carefully spoon the mixture into the jar.
- Decorate the jar with a ribbon and write a special message on the label
Not only does this scrub smell amazing, but it also helps soothe and soften skin—making it a thoughtful and practical gift. Now that we’ve pampered Mom or Grandma with a little self-care, let’s move on to something more sentimental. Our next craft idea helps kids express love with just paper and a pen: “5 Things I Love About Mom.”

5 Things I Love About Mom
Sometimes the simplest gifts are the most powerful. That’s why this next idea invites kids to slow down and think about what makes their mom or grandma truly special. Using a printable like the “All About Mom” page you see here, children can share heartfelt answers and personal reflections. It’s easy to complete, takes little to no prep, and becomes a meaningful keepsake that moms will read again and again.
What to Do:
Ask your child or student to fill in 5 things they love about Mom. If you don’t have a printed template, just fold a piece of paper and write the numbers 1 through 5. Here are some question prompts to guide them:
- What does Mom do that makes you laugh?
- What’s your favorite thing to do together?
- What’s something you admire about her?
- What’s one thing she’s really good at?
- What makes her the best mom ever?
Encourage creativity—drawings, stickers, or even a frame made from construction paper can take this craft to the next level.
This activity not only warms the heart but also helps kids build emotional awareness and gratitude. After all, nothing says “I love you” like words from the heart. Now, let’s brighten things up with a beautiful, budget-friendly gift that doubles as home decor—our next project is a Hanging Mason Jar Bouquet that’s bursting with charm!
Hanging Mason Jar Bouquet
If you’re looking for a gift that combines rustic charm with floral beauty, a Hanging Mason Jar Bouquet is the way to go. Not only is it easy to make, but it also brings a pop of color and joy wherever it hangs—on a doorknob, a porch hook, or even a classroom bulletin board. With just a few simple materials and a lot of love, kids can create a cheerful arrangement that Mom or Grandma will be proud to display.
What You’ll Need:
- 1 clean mason jar (regular or mini size)
- Fresh or faux flowers (daisies, tulips, or wildflowers work well)
- Twine, ribbon, or yarn (for hanging)
- A small piece of foam or pebbles (if using faux flowers)
- Water (if using fresh flowers)
- Optional: a handmade gift tag or label
Steps
- Wrap the Jar Neck: Tie twine or ribbon tightly around the neck of the mason jar, leaving extra length to create a loop for hanging.
- Prepare the Base: If you’re using faux flowers, add floral foam or pebbles inside to hold stems in place. For fresh flowers, fill the jar about halfway with water.
- Arrange the Flowers: Let kids choose and place the blooms however they like. Aim for a mix of heights and colors for a full, vibrant look.
- Add Finishing Touches: Attach a small gift tag with a sweet note like “Love You, Mom!” or “Happy Mother’s Day!”
- Hang and Admire: Help your child find the perfect place to hang the bouquet and surprise their loved one!
This bouquet may be small in size, but it’s big on heart. Plus, it’s a great way to encourage creativity and fine motor skills while making something truly beautiful. Now that we’ve brightened up Mom’s day with flowers, let’s get a little reflective with a fun and meaningful worksheet. Next up on the DIY Mother’s Day Gifts for Kids: All About Mom Questionnaire!

All About Mom Questionnaire
Before diving into glue sticks and glitter, let’s take a moment for something simple, sweet, and surprisingly touching. This All About Mom Questionnaire invites kids to share fun facts, favorite memories, and sweet observations about their moms. Whether you’re using this in a classroom, Sunday school room, or at the kitchen table, this printable is a wonderful way to spark smiles (and sometimes happy tears!).
How to Use It:
- Print the sheet – Kids will fill in fun facts like their mom’s favorite food and what she’s really good at.
- Let creativity shine – They can add drawings, use colorful crayons or markers, and even glue a small photo in the picture box.
- Encourage honesty and humor – Sometimes the most memorable responses are the silly or unexpected ones!
- Laminate or frame it – For an extra-special touch, preserve the page as a keepsake gift that Mom can treasure for years.
- Pair it with a hug – Because no gift is complete without one!
This questionnaire makes a great icebreaker before moving on to more hands-on crafts, and it helps kids practice expressing their love in words. Now that we’ve shared what makes Mom amazing, let’s create something that pampers her too. Next up on the DIY Mother’s Day Gifts for Kids: DIY Bath Bombs!

Bath Bomb
Creating bath bombs at home is a straightforward process that yields impressive results. The key ingredients include baking soda, citric acid, Epsom salts, and cornstarch, which work together to create that signature fizz when dropped into water. Adding essential oils and optional food coloring allows for customization, letting kids tailor each bath bomb to their mom’s favorite scents and colors. Once molded and dried, these bath bombs can be packaged beautifully, ready to bring a smile to any mother’s face.
Ingredients:
- 1 cup baking soda
- 1/2 cup citric acid
- 1/2 cup Epsom salts
- 1/2 cup cornstarch
- 2 1/2 tablespoons oil (such as coconut, almond, or olive oil)
- 3/4 tablespoon water
- 12-15 drops essential oil (like lavender, eucalyptus, or peppermint)
- A few drops of food coloring (optional)
- Bath bomb molds (or silicone molds, muffin tins, etc.)
Instructions
- Combine Dry Ingredients: In a large bowl, whisk together the baking soda, citric acid, Epsom salts, and cornstarch until well blended.
- Mix Wet Ingredients: In a separate bowl, mix the oil, water, essential oil, and food coloring.
- Integrate Wet and Dry Mixtures: Slowly add the wet mixture to the dry ingredients, a little at a time, whisking continuously. This gradual addition helps prevent the mixture from fizzing prematurely.
- Achieve the Right Consistency: The mixture should resemble damp sand and hold together when squeezed. If it’s too dry, lightly spritz with water and mix again.
- Mold the Bath Bombs: Firmly pack the mixture into your chosen molds. If using two-part molds, slightly overfill each half before pressing them together.
- Let Them Dry: Allow the bath bombs to dry in the molds for at least 24 hours. Once dry, gently remove them from the molds and store in an airtight container.
These DIY bath bombs are a delightful way to end our series of Mother’s Day crafts. They combine creativity, personalization, and relaxation, offering a spa-like experience that any mom would appreciate. Whether made in a classroom, church group, or at home, these bath bombs are a testament to the love and effort put into celebrating the special women in our lives.
Conclusion
No matter where you’re crafting—at school, church, or home—these DIY Mother’s Day Gifts for Kids are a heartfelt way to help children say “thank you” to the special women in their lives. From handprint art to homemade bath salts, every project is a chance to teach kids the value of gratitude, creativity, and giving. The best gifts don’t come from a store—they come from the heart (and sometimes a little glitter!).

Discover simple and effective video game rules for families to manage screen time, build connection, and keep gaming safe and positive.